
The equatorial “iron”, instrument to curb the firmament
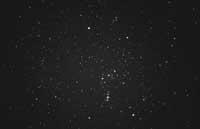
One of the most interesting photographs that photographers can make is the one that goes towards the North Star. Leaving the lens open for several hours, you get a photograph of curved lines, as all the stars of the firmament would move around the Polar Star. We could say that the apparent movement of the sky remains fossilized, but this spectacular photograph shows us the limitations to photograph the stars of the sky. The detection of low-light objects requires long exposure times and, when turning the Earth over its axis, as time progresses, the apparent movement of the stars is fixed as a curved line in negative.
Therefore, we need some tool to follow the movement of the stars to “stop” their movement. Therefore, to photograph the firmament, a heavy, uncomfortable, expensive and difficult to install equatorial mount is often used.
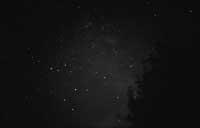
However, we can make a simple and inexpensive instrument to stop this movement, at least for a few minutes, obtaining photographs of the Milky Way, nebulae, galaxies and some low-light objects.
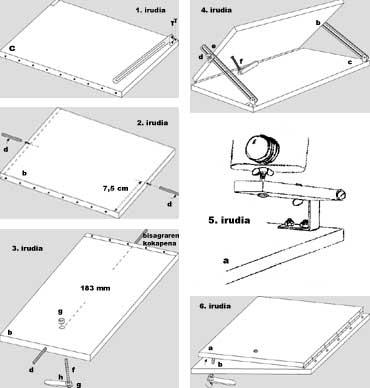
This apparatus, called equatorial “sheet”, consists basically of three articulated wooden boards. The table on which the camera is fixed must move with the same apparent angular velocity of the stars (revolutions per day). This slow motion is obtained by the displacement of a screw that moves at a turning speed/minute. Two other sheets will form the latitude angle of the area and the whole will have to be directed towards the North Star for precise tracking (see figure 1).
How could we make the equatorial “plate”?
Once you have purchased the tools and materials indicated in the table, you will prepare your equatorial ‘plate’ by following the steps detailed below.
In the c panel we will point out with pencil the feet and holes of the guides. Also the holes of the piano band on all tables. Then set the guides (see figure 1). Before inserting the headings it is advisable to mark the holes with the drill. EYE! Respect the sense of construction, since in the rest of the cases you must go to the Southern Hemisphere to make good use of the device!
On the two small faces of table b, at 7,5 cm from the edge, a hole of 3,5 mm of diameter and 20 mm of depth will be made by the drill, introducing a screw (d) of 4 mm without head, leaving 10-15 mm on the outside. To make it stronger, a little tail is placed in the hole (see figure 2).
The screw used to push the board a, if it is of thread size 80(f), will be placed at 183 mm of the band. The board is drilled and a nut (g) is placed on each side once the screw is inserted. The nuts are glued with glue (see figure 3).
The thread size of this screw is related to its location. With the angular velocity (in revolutions per minute) given to the screw, with its step and location, the angular velocity of the table is obtained in turn/day.
If a screw of another thread measure is used, the distance to which it should be located will be calculated. To do this, use the following formula:
R = 229,3 x screw pitch in mm
This ‘R’ indicates the distance at which the screw e of the band should be placed. Considering this distance, you have to adjust the size of the tables.
The above formula is obtained from:
‘R’ = v/w
where
- v = linear screw speed = thread pitch/60 (mm/s)
- w = angular velocity of table a = Earth = 2 /24 x 60 x 60 (rad/s)
The c and b tables will be joined with a 22 cm piano/band. In each screw (d) a washer must be placed and in place the guides and the butterfly nuts (see figure 4).
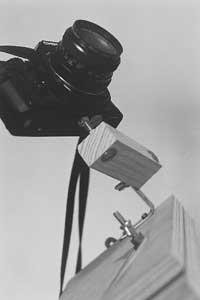
Since there are different types of labels with photographic tripods, you have to look for the best method of fixing (usually the corresponding screws, nuts and butterfly nuts are searched) (see Photo 1). However, before tying tables a and b, in table a, at about one and a half centimeters from the top edge, it is necessary to make a hole to insert the screw corresponding to the label.
As discussed above, instead of buying the tripod patella, we could do it. To do this, consider Figure 5 and the photograph on page 65.
Finally, tie the boards a and b with which we go. EYE! Constructive sense will be respected (see figure 6).
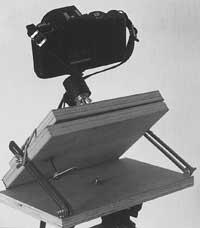
Once finished, the equatorial ‘plate’ you have created is similar to the one seen on page 64.
To carry it the screw f is removed and once folded it takes the size of a book.
Usage
You know how to create the gadget, reader. Now, before you start using it, we indicate the points to consider. First, you should know the latitude of the place you are going to use. Therefore, once the corresponding latitude angle is represented in a solid cardboard, you will cut it. Once this cardboard is inserted between the tables c and b, its latitude is fixed by the butterfly nuts of the guides.
To take pictures, instead, on a wall, or better if it is on the tripod, you can place the ‘plate’ (if you are going to use the tripod, in the center of the table c you have to make a hole to be able to fix the ‘plate’ using the tripod screw) and direct the axis of the band between a (see figure 1) towards the North Star.
Before placing the equatorial “plate” and taking out the photo, you should consider:
- The camera in position b, focused on infinity and selecting the smallest number (the largest aperture) at diaphragm scale.
- That it is mandatory to use cable to make clis.
- Sensitive film of 400 ASA or higher is recommended.
- Since after pressing the shutter the h sheet must be moved with a turning speed/minute (for example, following the movement of the second needle of a watch), it is recommended to perform previous practices.
- The most suitable exposure time is 2 to 10 minutes.
Finally, with this device you can take out nebulae, galaxies, wide areas of the Milky Way, open clusters, planets… Therefore, you can immerse yourself in a deep space and with the help of a computer program you can find what you can not see at first sight.
It is already in your hands the assembly of the reader and the possibility of making your own photographs. We have provided you with the necessary information.
So encourage and see what kind of pictures you take.
What is needed to make the “iron”?
Tools
- Screwdriver
- Rule
- Wrenches
- Iron cutting saw
- Drill
Materials
- Tail similar to “Aralite”.
- Three plywood panels 15-20 mm thick: a 20x15 cm surface, b 22x15 cm and c 25x15.
- Two parts of the 15 mm wide piano band: 22 and 15 cm.
- 20-25 grids of 3 mm in diameter and 15 mm in length.
 With this device you can extract nebulae, galaxies, large areas of the Milky Way, open clusters, planets… Therefore, you can immerse yourself in a deep space and with the help of a computer program you can find what you can not see at first glance.
 - (d) 2 screws 4 mm in diameter and 35 cm in length. (You have to cut your head.)
- (e) Two 4 cm diameter butterfly nuts.
- (f) Length 5-6 cm, diameter 5 cm and screw of 80 threads. That is, 5-80 meters. (The thread size of this screw is very acidic as it conditions the length of the boards.)
- (g) Three nuts and pants corresponding to this screw.
- (h) Metal sheet “Mecano” of 4x15 cm of wood or similar.
- (i) Two 15 cm guides. Through these guides we can apply the latitude corresponding to the plate. In the DIY shops you can find different models, or you can make ourselves with a wooden board 15 mm wide, 3 mm thick and 15 cm long.
- (j) Photographic tripod label (available in photo stores).
- (j’) The other option is to do us instead of buying the patella. We will get cheaper but we have to work more (see figure 2). This requires the following material:
- Two one-quarter inch diameter and 6 cm long screws and corresponding butterfly nuts and nuts.
- Perforated profile “L” 4 cm long and two nuts and two screws necessary for its connection.
- Wooden block 3x2x8 cm.
Zu idazle
Zientzia aldizkaria