
Positivated in black and white
Elhuyar Fundazioa
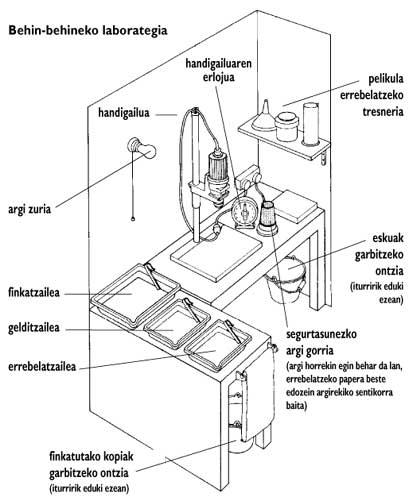
We saw that a film development laboratory is not necessary, but to make copies and enlargements is essential. The laboratory not only allows you to make faster and cheaper copies, but allows you to manipulate them and have greater control of the results. In any case, without pretending to reveal, understand and know the process will help us to understand many of the errors that can occur in the photos. In the event that the installation of a definitive laboratory is not possible, a temporary laboratory may also be available, for which the necessary basic tooling can be seen in the image on the left.
The place of assembly of the laboratory must have an electrical and luminous installation (preferably white) that allows its darkening. It is important to distinguish between the humid (area of tanks and sources of baths and/or water containers) and the dry (area of wholesalers, paper and clock).
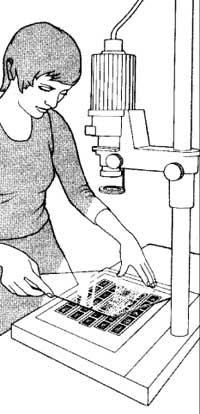
The first work to be done is tactile copies of the revealed film. They are paper copies of contacts, negatives and paper in direct contact. The base material for this is glass, white light (amplifier or lamp), paper and safety light. The steps to follow are as follows: 1. Clean the glass thoroughly. 2. In the safety light, a development sheet is placed with the emulsion up, on which the emulsion is placed downwards, the negatives together. 3. Place the glass on top. 4º It is known with the necessary exposure time, but in the absence of reference, the objective is kept in two closed points (starting from the maximum) and for 8 seconds in total exposure.
If any of the negative bands is clearer than others, when it has been half a time to cover it with a piece of cardboard or other similar opaque; and if it is too dark, double the time spent on the rest, covering everyone else.
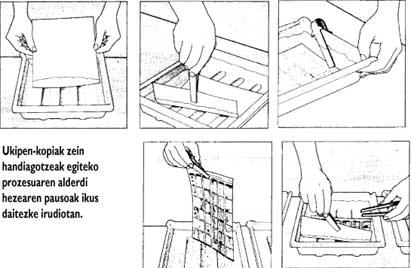
Next, the wet part (process similar to that of the film): 1. First of all, keep the bathrooms revealed, stopped and fixed in vaulted paths and in good order. 2. Insert the paper upside down into the developing bath at 20ºC and start calculating the time. Turn the paper around (always without removing it from the developer) and activate the barrel. At 30-40 seconds the image will begin to appear.
Act regularly until the corresponding time is complete. 3. Once the time has passed, the copy is taken out and the excess water is removed, it gets into the stop bath (without wet the clamps with the detention bath). 4º Take the copy of the clamps of the stop bath after a while and put it in the fixator. The fixing time is about 10 minutes (maximum 20 minutes), but after two minutes you can turn on the light and see if the copy has had a good exposure (if it is too light, you will need more and less if it is too dark). 5. To finish the copy will be cleaned. Like the film, it is very important to clean it well. Conventional papers require 15 to 20 minutes of water washing. 6º Finally, it is placed in the drying once the excess water has been removed.
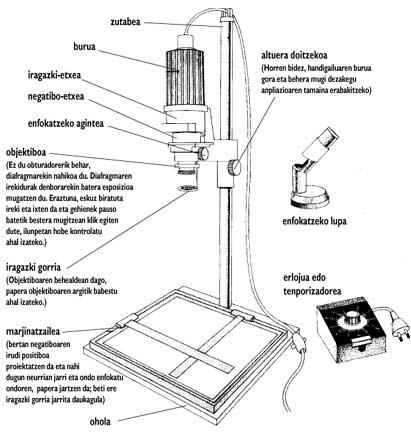
The amplifier is a projector, but mounted vertically and less flammable light.Before making enlargements it saves time analyzing the tactile copies and selecting the photographs that are desired. Above all we have to look at purity and framing. Do not forget that in addition to what is well, the amplifier also increases the stripes, dust, focus defects and camera movements.
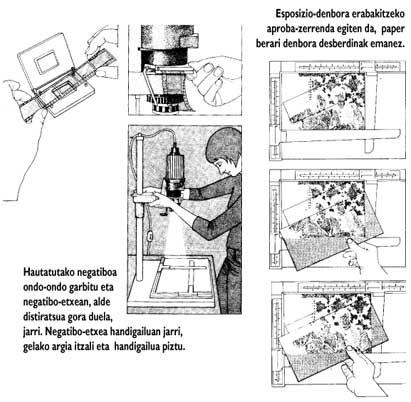
The enlargement process is as follows: 1. Clean the selected negative perfectly and place it in the house of negatives with the bright side up. Place the negative house in the booster, turn off the room light and turn on the booster (from now on we will work under the safety light). 2. To decide the size of the fully open and extended diaphragm, move the booster head up and down the column until the image reaches the desired size in the panel. Then focus well (we can use a specific magnifying glass for it, either precisely or well). 3. Before increasing the exposure time should be decided.
A list of tests is prepared for this purpose. Taking a piece of developing paper and selecting a significant part of the image, the paper strip is given time so you can check it. For example, in the opening of f8 or f11, in a case that seems to take about 10 seconds, a test list of 3, 6, 12 and 24 seconds is made. Once chosen the most suitable time, the full photo is brought to light on a paper. Not forgetting that the paper should be under the safety light as we pull it out of the box and focus it well. 4º The following are the same guidelines as those described with the touch copy: development bath, stop bath, fixator, cleaning and drying.
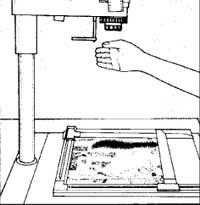
We already have the increase of the selected negative. Now we have to start analyzing it and see if the exposure we have given it has been adequate. If it has been too short, the photo stays too clear, if it is too long it stays too dark. In any case, we will have to repeat it by reviewing the list of tests and the extension itself and calculating another exposure. Sometimes the negative itself has no uniform illumination. In these cases we will not be able to give the same exposure to the whole image and we will have to cover some parts during the exhibition. We can use the hand (or fingers) or the cartoncillo pieces to cover, but considering that we must move them a little during the coating so that no traces remain.
To be straight, the main lights should not be gray and present details (for example, in a portrait, the white and the teeth of the eyes should be white and white and differentiate from the skin, with another tone and details); the main shadows or dark aspects should show details (for example, hairs) and be separated from the skin by a large number of different grays between shadows and whites, if the one three-dimensionality. If you have too many greys, the result will be too gray and if it is too weak, too dark. The contrast can be changed using different levels of paper.
The main levels of paper are three: smooth, normal and hard. The soft is usually 1 (or 0) and has a large number of greys between black and white and is suitable for revealing high contrast negatives. Normal 2 and suitable to reveal normal negatives. Hard, usually 3 to 5 and with less gray, it is suitable to reveal low contrast negatives. The paper can be glossy, matt or semi-matt.
Zu idazle
Zientzia aldizkaria