
Developed and positivated in color (I)
Elhuyar Fundazioa
As in black and white, no laboratory is needed for film development, but more products are needed, so you'll need to have more containers to store. The thermometer can serve, but only if necessary at temperatures close to 38º. It doesn't take much more material, but both movies and bathrooms and paper are more expensive. (We'll see what to add to the lab in the next article.)
After learning to reveal in black and white, you should start with color. Although it is not essential, at first it is advisable to use materials of the same brand as the film. Therefore, we will start the development process with the help of the image of the next page. (Read the May and June articles quickly and read on.)
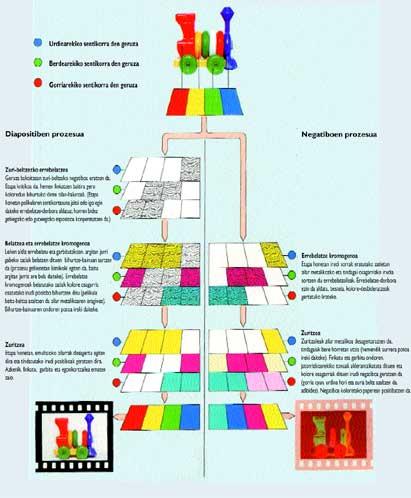
Most colored films (and paper) consist of three layers of emulsion with several silver tints and halides suspended and sensitive to a primary color. According to the “subtractive” principle, the subject’s colors are reproduced from the three components (this, magenta and cyan). Thus, by bringing the film to light, each layer forms a deafness image of the parts of the subject with its corresponding color.
In the development, the latent images of each layer become complementary color images and the three layers reproduce at once any tone or color. Slides support a conversion process that forms a positive image in the film itself. Negatives provide an image formed by negative tones and complementary colors that should be positioned on paper. (Slides can be scrambled as negative for special effects, but if they are revealed doing negative you do not get image).
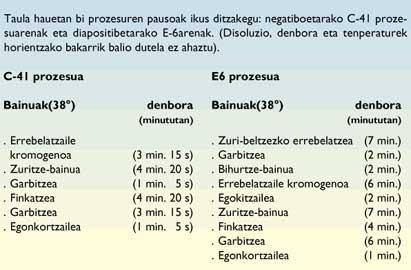
The steps described in the scheme on page 46 are basic steps, depending on the type of process or even the brand, even if they go towards a uniformity (for a long time there will be two types of processes, one for negatives and one for slides). Carefully read the instructions for each process.
Therefore, the slide process can be terminated in this. They just need to put frames. We will see how negatives are positivated in the next and last article of this section.
Research to get a colorful film began shortly after the photo was invented. In 1861 the Scottish physicist James Clerk Maxwell made the first full-color photograph. He took three sheets of black and white and put them to light through red, green and blue filters; he projected them overlapping and again with filters (thus showing the additive synthesis of the three primaries). Soon after, two young French created a system to obtain a positive image of the 3 transparencies. One of them, the French pianist Luis Ducos de Haron, plays 'Les Couleurs en Photographie: In 1869 he published "Solution du Problème". He went from theory to practice and in the 1970s he made high-quality photographs. G. The process invented by physicist Limman also came to reproduce the color with great quality, but it was very complicated to put it into practice and it was not beyond being a laboratory experiment. In 1907 the Lumiere brothers (precursors of cinema) invented autochrome plates. The merit was to be able to combine all the elements of the process into a single sheet. In this way it was enough to take a single photo (the previous processes needed three). Until then it was more practical and simple than systems and could be marketed. Autochromes were well known and used in abundance. Being able to work in colors with ease and precision came from the hand of the musicians Leopoldo Mannes and Leo Godowsky. In 1935 the film KODACROM was created, the best known in the world, in the free hours that KODAC dedicated to the laboratory. In 1936 the German house AGFA produced a negative film to make images on paper. Since then, color became a photographic tool. The purity of color and saturation were assured.
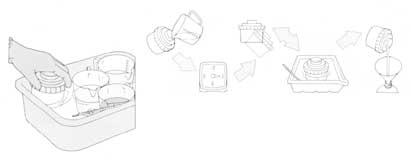
The products are sold in games with everything necessary for a certain process. Solutions can be used several times. For each liter of developer solution four 35mm films can be used. Due to the double capacity of the other bathrooms, most games include a double volume of developer.
For the preparation of the products:
Once the gloves are placed, pour all the dissolutions into pre-numbered containers and place them in a deep barrel with water at about 48 degrees. When the temperature of the first developer is between 35º and 40º, pour hot or cold water to acceptable limits. The boat must also be accompanied by solutions in a hot water bucket. Have on hand all other tools (clock, bottles, funnel, etc. ). Make sure you have enough water to clean the film at the right temperature. Do not forget that very precise temperatures are needed, as they accept the fall of a third degree. (Temperature check during the process).
Once the film has been introduced into the revealing pot in total darkness (like black and white), what needs to be done at every stage is:
Always act the same way on the boat, following the instructions of the process. Immediately after filling it you have to hit the pot to avoid bubbles. Then we will continue driving, putting you half a minute down. Reserve the last 10 minutes of each stage to empty the can. Once cleaned last time it is given a stabilization bath so that the film hardens and lasts. Most colored films have a rather dull wet look. Therefore, the result cannot be judged until it is dry. It should be kept in hot water when not acting.
Zu idazle
Zientzia aldizkaria