
Astronomical photography and its didactic use (I)
You may have observed the night sky many times and become fascinated by the beauty of the stars. Big Bear, Polar Star, Orio, etc. has tried to identify it. If you like the night sky, you will enjoy taking more photos! Whether you are going to start or the teacher who is encouraged to work on astronomy, we will propose two ways to take pictures: keeping the camera fixed (you will work on this article) and moving the camera (we leave for an upcoming occasion).
Instrumentation and preformation
To get started, you just need camera, tripod, clisk cable and film. If it is with variable optics, better. In addition, it is convenient to have multiple exposure lever (with capacity for two photos in the same frame).
The camera is located on the tripod, attached to the screw on the base. The stronger the tripod, the more stable it will be. If it is not very rigid, extend your legs to the maximum and hang 2 or 3 kilos of sand from your axis. If you do, you will reduce the vibrations caused by the wind, obtaining more stability.
Clisk cable is used to prevent camera movement occurring during shutter opening and closing.
As for the film, it is recommended to use color slides between 100 and 400 ISO (for more information see Elhuyar. Section of “photography” number 88 of the magazine Zientzia eta Teknika).
The location of the photographs will be selected according to the following criteria:
- work in total darkness, therefore away from roads and street lights and in moonless nights, and
- you have to see a wide horizon.
Also note the shutter speed, since if not the stars are points, they will be lines or nothing will be seen. Remember that the focal length of the objective shutter speed is related to the part of the sky we want to extract. For example, if you want to take stars close to the equator with a target of 50 mm, the shutter speed to use is about 20”.
The shutter speed can be increased without striping in the following cases:
- approaching the poles and
- when using objectives that span a wider scope, i.e. those that have a shorter focal length, such as 28 mm.
We propose to photograph the stars near the Polo and Ecuador with a shutter speed of more than one minute.
The characteristics of each photo should be noted: type of film, optics, area or object photographed and shutter speed. It is recommended to take photos using different shutter speeds. This way you can choose the right speed next time.
Therefore, the notebook is mandatory.
Photos with fixed camera
Once the camera is placed on the tripod and the clisk cable is placed, it focuses towards infinity. Select the smallest number, the largest aperture, at diaphragm scale.
Some of the photos that can be taken are:
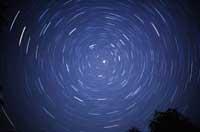
Apparent motion of the sky
This is the most rewarding photo for beginners. The camera is oriented towards the sky and left open for several hours. In the image will appear the lines of light that explain the apparent movement of the stars. Directing the camera to the North Star and keeping open for 2 or 3 hours, you get the most spectacular photo
This gives an example of relative movement, adding work to the professor of physics:
- explain the angular movement
- calculate the apparent displacement of the sky in an hour and compare it with the time differences of the different peoples.
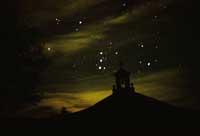
Constellations
A 50 mm lens and 400 ISO film are recommended. Systematic work will give us:
- Personal atlas of the most known constellations that will serve as reference.
All stars can be named in class compared to bibliographic maps.
- Using colored film, stars in colors (blue, red, etc.) to see him.
Colors can be related to temperature. On this basis the evolution of the stars can also be explained.
Photos of the moon

* If you photograph the Moon during a cycle, on consecutive days, at sunset (from the beginning of the new moon until possible), it will appear in different positions with respect to the stars and so you can know:
- Its trajectory (and you can also compare it with the ecliptic).
- Relative movement of the Moon, Sun and Earth.
- Why the moon comes out every day.
- Sidereal and synodic month.
* Photographic series of the Moon can be made with multiple exposure lever. The main difficulty of this sequence is the prediction of the displacement of the Moon to perform the proper encoding.
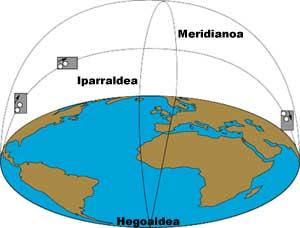
When framing the first photograph, if the Moon is coming out or has not passed through the Meridian, it should be placed in the viewfinder to the lower left and in the upper left if it has already passed through the Meridian (see figure above).
To avoid overlapping images, it is advisable to leave periods greater than 3 minutes. A 50 mm lens will allow you to track for 3 hours. 200 mm, one hour.
With this photo you can calculate the angular diameter of the Moon.
The photographic series are widely used in eclipses, since in the same image the whole process is collected.
From photographs taken with a target of 200 mm, the shadow of the Earth allows to calculate the size of the Moon.
Tracking the movement of planets with respect to constellations

Photographs taken on different days show the movement of the planets towards the starry sky. This is the best method to study the regression movement of the planets, especially in the cases of Martitz and Jupiter. For this you can use films between 100 and 200 ISO.
With these photos you can analyze:
- the trajectory of the planets and, consequently, the position of the ecliptic and
- relative movement of planets.
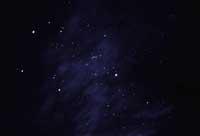
Groups of stars
It is one of the most interesting phenomena in sight or to expand our photographic collection. The easiest thing is what makes up the Moon and planets, like the Moon and Venus. But sometimes they can go out to a Saturn, Martitz and Jupiter forming a “golden triangle”. Try to get that photo!
Zu idazle
Zientzia aldizkaria