Purity Control (I): Depth of field
Elhuyar Fundazioa
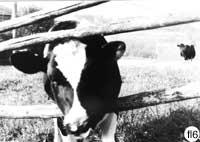
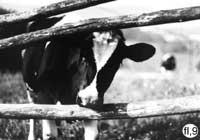
For agile images (and if you want to achieve the opposite) it is important to know the rules of maximum purity.
Depth of field (purity area) and shutter speed, which depends on the aperture of the diaphragm, are the main factors influencing the purity of the photo.
In this section we will address the first and leave the second for the next.
The depth of field, focusing on a specific object, is the distance between the nearest and distant point that appear smoothly in the image. When performing a portrait, for example, there is an area that, in addition to the focused one, appears before and after. The depth of this area depends on the diaphragm chosen. The changes in this parameter are mainly observed in photographs formed by elements located in different planes.
Remote images (landscape, e.g.) or in plain images (at the front of a building, e.g. ex.) On the contrary, it is not so noticeable, as most points are at the same distance from the target, and are attenuated at any opening.
In the SLR cameras, in general, it is a preselected control: the objective is at the highest aperture during the photo shoot, regardless of the chosen diaphragm; only when doing kils closes the iredicine of the diaphragm and so, when more light gets in, there are no focus problems.
But many cameras also have a button to place the diaphragm in the selected aperture. Lets you see the depth of field before taking the photo. Clicking on this button darkens the image and looks with zeal some of the parts that were previously blurred.

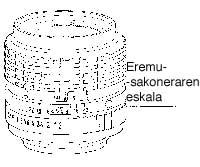
Field depth is not directly visible in telemetry cameras. Therefore, most of the objectives have drawn a scale that allows to calculate it. The depth covers the back and front of the focused element. With larger openings (f2,8 or f2, e.g. ex.) Field depth is reduced and with small openings (e.g., f16 or f22) field depth is extended.
The depth of field depends not only on the opening, but also on the relative magnitude of the subject in negative or in photography. Therefore, when approaching the subject the depth of field decreases, since the enlargement increases and vice versa.
For example, with a target of 50 mm and 1 m away, the depth of field occupies two thirds of the back of the focuke point and a third of the facade.
It has been said that most targets carry a scale next to the focus ring to calculate the depth of field corresponding to each aperture. It graduated in “f numbers” and indicates what will come out above and below the focus point. For example, by placing the objective approach of the figure at 6.6 m and in the diaphragm of f16, the depth of field extends from 3 to infinity, while in the f2,8 it extends from 5.4 to 7.3 m.
The scale allows us to select the diaphragm based on the desired depth of field.
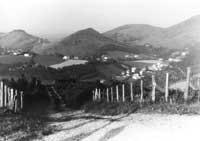
Therefore, the focus is always attenuated, but the purity of the rest depends largely on the diaphragm we choose. This selection is in the hands of the photographer, who must act according to the results you want to obtain (and to the extent that lighting conditions allow).
However, do not forget that when using large diaphragms (small “numbers f”), with the focus you have to be more careful than when using small large “numbers f”. The approach with small diaphragms is less critical and the latitude is greater. Also, keep in mind that using small diaphragms you get better quality photos than using large diaphragms.
You can prove it Look for an outdoor theme with proper light and let yourself be carried through the foreground to the bottom its details. 6 photos on the same topic:
Compare the results and choose the ones that best fit the theme. |

